Sunday, July 19, 2009

Cherry Pie

This week I decided to make a sour cherry pie (recipe found in Martha Stewart's Cooking School).  However, Thursday rolled around I still had not made the dough. Work was getting in the way again. By the time I got home there wasn't enough time for the pie to bake without my having to stay up until one in the morning.

Friday morning I got up early and made the dough before I went to work. I left in the fridge to chilled and felt confident that that woul
d be the day. When I got home I rolled out the crust, placed it in the pie dish and set out to prepare the filling. Wow, did I underestimate the time that would take. I had to pit every cherry by hand. It took a half hour and I found myself wishing I had a Cherry Pitter. However when it was all done and the pie was in the oven the smell was great. The trick for  great flaky crust is to make sure your butter is cold. Nice cold butter pieces = flaky dough.

Why is there a slice missing from the photo? My husband spotted it on the cooling rack ;)

Monday, July 13, 2009

Cherry tart


Nothing says summer like a fresh fruit tart. The following is the recipe for the tart I made last week which resulted in the unfortunate arm burn (healing nicely). Burn or not, the tart tasted great and if you lift from the sides you'll have some delicious dessert without the scar.

Tarts come in several varieties. Some incorporate the fruit by baking it and some place it on top of the tart fresh. This recipe is a traditional tart in which you bake the shell first, then fill it with pastry cream or custard and place fresh fruit on top. Some people prefer to pour a simple sugar on top, but I enjoy leaving the berries whole and untouched.

Tart Shell:
2 cups flour
1/2 cup sugar
1/2 tsp baking powder
3/4 cup butter cut into chunks
1 egg yolk
2 tbs. lemon juice

Preheat oven to 400. Combine flour, sugar, baking powder in a food processor with a dough blade. Pulse until combined. Add margarine and pulse until crumbly. With machine running add egg and juice. Pastry will form a ball. (I prefer to do this all by hand but it does take more time that way). Press dough into 11 inch tart pan. Prick tart all over iwth a fork. To ensure even rising You may weigh doen the dough with pie weights (or navy beans in a mesh oven proof bag). Place in the oven and bake for ten minutes. Reduce heat to 350 and continue to bake for 10 more minutes. Remove from oven and allow to cool completely.

Vanilla Pastry Cream:
1 cup whole milk
2 Tbs. vanilla
2 Tbs orange juice
2 large egg yolks
1/4 cup plus 3 tbs. sugar
3 tbs flour

Bring milk, vanilla and ornage juice to a boil in medium sacuepan. Remove from heat and let sit 20 minutes. Whisk yolks and sugar until fluffy. Add flour flour until well incorporated. With mixer on low and 1/2 cup of milk mixture to the egg mixture and mix. Pour entire thing into pan and whisk. Heat while whisking constantly for about 4 minutes, until thick enough to coat the back of a spoon. Remove from heat and pass through a sieve into a glass bowl sittingin an ice water bath. Let cool completely and pour into tart shell. If you prefer a perfectly neat tart you may use a piping bag to transfer cream to tart.

Top the cream with halved cherries. For an extra special look use red and white cherries. Some people like to cover the tart so completely you cannot see the ceam. Some people like to place them scattered. This is up to your own personal style.

Wednesday, July 8, 2009

Hazards of Baking

Today I made a delicious cherry tart (recipe and pics to be posted shortly) but unfortunately it was not entirely smooth sailing. I neglected to remember that tart pans have a removable bottom which helps you lift out your beautifully crimped tart dough and slide it onto a platter. As I lifted the dough out of the oven I mistakenly held it by the bottom. Whoosh went the tart bottom, leaving the rim to fall onto my arm. And now I have a lovely red line on my arm as reminder to always hold by the edges when making a tart. Time will tell how it heals.

On the bright side, my tart has a great release system. 

How to handle a burn: Wash with copious amount of cold water. Keep chilled. (If using ice, wrap in a towel or plastic NOT a paper towel which can leave fibers on your skin. Place some aloe on the wound as necessary. If it hurts excessively or covers a large amount of skin please seek medical help. It's better safe than sorry.

Sunday, July 5, 2009

Cocoa 101

If you're like me, when you read cocoa on a recipe you ignore the rest of the text, pick up your canister of cocoa and throw it in. But this can be a serious disaster! When it comes to cocoa not all are created equal. There are two main types of unsweetened coca and while substituting one for the other may not ruin your baked creation it can seriously detract from the flavor.

Dutch processed cocoa aka alkalized cocoa is treated with alkali to neutralize it's natural acids. It's reddish brown, has a mild flavor and dissolves well in liquid. It's neutral properties mean it will not react with baking soda and must be used with baking powder instead (unless you have sufficient acid in other ingredients to make up for it).

Natural unsweetened cocoa has a much richer, more bitter taste. It reacts with baking soda in a leavening reaction that causes your cake to rise. This stuff is intense and should be used accordingly: think brownies and deep, rich chocolate cake.

So next time you read cocoa on a recipe, check which one is called for. It pays to follow directions.

Friday, July 3, 2009

To Dome or not to Dome

When most of us think of cupcakes we think of those beautifully domed and frosted confections sold in bakeries everywhere. However, sometimes that gently sloping dome gets in the way of your decorating and you wish for a flat surface. So how can you control the rise of your cupcake? Adjust the heat on your oven. The hotter your oven the more likely your cupcake will dome. So to avoid the dome lower the dial to 325 and bake for a few minutes longer.

Thursday, July 2, 2009

Peppermint cookies


Remember those girl scout cookies you used to eat by the dozen? Well here's a slightly grown up cousin of theirs, adapted from a recipe in Martha Stewart's Cookie book. The hint of peppermint hiding beneath the rich chocolate flavor is superbly refreshing and the crushed candy topping gives the entire cookie an old school charm.

Chocolate Peppermint Cookies: (yields 3 dozen)
1 cup all purpose flour, plus more for dusting
1/2 cup unsweetened dutch processed cocoa
1/2 tsp baking soda
1/2 tsp baking powder
1/2 tsp. salt
2 tbs. butter softened
3/4 cup sugar
1 large egg
1 egg yolk
3/4 tsp pure peppermint extract
2 lb coarsely chopped white chocolate
20-30 crushed peppermint candies


Tip: To crush peppermint candies place them in a ziplock bag and hit them with a meat tenderizer or rolling pin (My husband loves to do this for me).

1) Preheat oven to 325 F
2) Sift together flour, cocoa, baking powder, baking soda, and salt.
3) Beat butter and sugar together for one minute in a mixer on medium.
4) Reduce speed to low and egg, then add yolk.
5) Beat in peppermint extract
6) Add cocoa mixture slowly.
7) Wrap dough in plastic and refrigerate until firm. It may be necessary to place it in the freezer for several minutes.
8) Roll dough into jawbreaker size balls and place on parchment lined baking sheets. Make sure to leave room for cookies to expand.
9) Bake cookies until dry, about 12 minutes.
10) Lift parchment paper onto a wire rack and allow cookies to cool.
11) Melt chocolate in a double boiler.
12) Use a fork to dunk cookies into the chocolate, rotate cookie to evenly coat and to let excess drip off.
13) Dust with chocolate and place in fridge for up to three hours to allow chocolate to dry.
These cookies are great for the holidays, but who needs to wait until then? Bake a bunch today and I promise they won't last past the weekend.

Wednesday, July 1, 2009

Chocolate Curls

Chocolate curls are an easy way to dress up any cake. Here's a simple method to form the curls and a few of the projects I've made with them. You will need a block of chocolate in your preferred color a vegetable peeler and a piece of wax paper. Remember chocolate is a fragile food and you should not leave a chocolate decorated item out in the heat.

Chocolate Curls:
1) Soften your block of chocolate by heating it in small bursts of 10 seconds in the microwave. You are trying to soften the chocolate, you are not trying to melt it. As soon as it seems somewhat pliable it is done.
2) Place the wax paper on a clean working surface. This is where your curls will fall.
3) Hold the chocolate over the paper and gently scrape the peeler across it just like you are peeling a potato. The chocolate will curl as you peel it. You can alter your pressure to create thicker and thinner curls. If the curl crumbles, your chocolate is not soft enough and you should microwave it again.
4) You can tighten or loosen up the curls after they fall with your fingers to your desired shape.
5) Let them firm up on the wax for a few minutes before using them. Curls can be saved in an airtight container in the fridge for 1-2 weeks.

Simple Elegance:
I dressed up this chocolate frosted cupcake with a sprinkling of white chocolate curls on top.


Graduation:
I tied a twizzler pull and peel licorice around a white chocolate curl to create a diploma. The graduation cap is a mini Reese's cup with a chocolate slab glued to the top with frosting.

Sugars 101

If you've started to look at cake and frosting recipes you are probably realizing you need to learn a whole new vocabulary. It doesn't help that some ingredients are called different things by different people. Here's a quick guide to the different types and names of sugar you may encounter.

1) Granulated Sugar - If your recipe calls "sugar" and doesn't say anything else, this is what it means. It is regular table sugar and is refined from either sugar cane or beets.

2)Caster Sugar - Also called "superfine" sugar, baking sugar, and bar sugar. It is ground finer than granulated sugar and dissolves excellently in liquids. Commonly used in meringues and very light cakes where you do not want any grittiness from your sugar.

3)Icing Sugar - Also called confectionary sugar, and 10X sugar. Commonly used in icings and frostings as well as to dust and garnish baked items. Sift before use as this can clump when left out.

4)Unbleached - This is essentially granulated sugar that has been processed less and thus has a light blond color. You can use this anytime you would be using granulated sugar.

5)Sanding Sugar - Also called Crystal sugar. This sugar has larger crystals and is used for decorating baked items.

Brown sugars are a category in and of themselves and deserve their own post. Happy baking!

Tuesday, June 30, 2009

Will work for cake pans

Cake is only as good as the pan you bake it in. After lots of research with my library of cake decorating books, on websites like cake central and just plain asking around I got the general sense that aluminum is the way to go. There are two great pan lines out there, Fat Daddios and Magic Line. When it comes to round cakes the jury is still out as to which one is better, but for square cakes, Magic Line is by far the crowd favorite. They give you sharper edges and a more even bake. Well, how could I settle for less than the ultimate in cake pan products? The Magic Line Pan Set
quickly went onto my wish-list.

Unfortunately the pittance they call my graduate school stipend does not allow for luxury items like baking supplies. Therefore I am starting a series of "Will work for..." posts that deal with my search for alternate funding. Yesterday I auditioned for a tutoring company. Luckily it went well and I may have a student soon! Until then the pan will wait on the wishlist. Until I can buy it... here's to making cookies.

Friday, June 26, 2009

Cupcakes: A Great Place to Get Started

Many an aspiring decorator is daunted by the task of making and decorating a giant three tier cake. While many people practice on upside down cake pans or styrofoam, I wanted my finished products to be edible. That's where the cupcake comes in. They're small and you can try out many different styles. It didn't hurt that my husband had given me a copy of Hello, Cupcake!: Irresistibly Playful Creations Anyone Can Make for my birthday. This book is great for the beginning decorator since it focuses on designs that don't require that much equipment. I used a yellow cake recipe and buttercream. 

The Panda:

Aren't they just adorable? Made out of cupcake, oreos, frosting and chocolate chips these were a big hit with everyone who saw them. The head is a mini cupcake glued with some buttercream to the larger, crushed oreo covered cupcake below. If you have difficulty slicing the oreo arms, microwave the cookie for a few seconds to make it more pliable.
The Snowman:

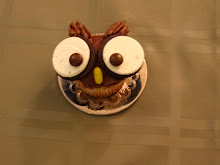
Another mini cupcake for the head, with coconut flakes for snow. Fill the corner of a sandwich baggie with chocolate icing, cut off the tip and use gentle pressure to pipe the small dots for the mouth. Always touch the bag to the cupcake as you release your pressure. This finishes off your dot and prevents it from pulling away. The nose is a cut piece of juju fruit. You can use taffy as well. For extra realism use a knife to score some lines in the taffy and then rub it in cinnamon for a real earthy carrot look.

The Owl:

Another great use for oreos. Just twist open and use the frosted half as an owl eye. Once again, if you have trouble getting the oreo to twist nicely, microwave it a little first. Use two chocolate M & M's to make pupils. The ears are my own modification on the owl presented in the book. I used pecans and then chocolate frosted them using a ziplock bag instead of a pastry bag. Use any yellow colored candy you can find for the nose. Mine is a fruit and plenty.

For the true beginner:
This web-like flower always amazes guests who rush to ask how I made it. In reality, it is the simplest of all the cupcakes that I have posted today. Just ice your cupcake in one color. Fill a ziplock with a contrasting color and snip off the tip. Then pipe three (or more) concentric circles on the iced cupcake. They do not have to be perfectly round, the design will cover any minor flaws. Now take a toothpick and gently drag it through the cupcake a few times, alternate between dragging towards the center and away from it. The icing will pull with the toothpick creating the design shown above. VOILA~ you too have created a lovely cupcake.


Thursday, June 25, 2009

The Quest

When I was a little girl one of my favorite things to do was drool over the 'Martha Stewart Weddings' magazine. The dresses were sparkly and glamorous, the favors adorable and the registry checklists hinted at a life of gleaming appliances and upscale coking. When I was forced, by the tyranny of space constraints, to send an issue to the recycling bin I would first lovingly snip out my favorite articles and pictures. What did I save? The tiaras? The destination honeymoons? Nope. It was the cake. Tiered, sculpted, cupcake, you name it. Something about those beautiful cakes filled me with glee. So it came as a shock to many when six months ago I got married...WITHOUT a wedding cake. 

What you say? How could I not have a cake? Simple. This was a big wedding that was all ready costing an arm and a leg and wedding cake is not really part of my families tradition. So I didn't have one. I am a full believer in brides remaining in budget. Besides, if I couldn't have the cake I wanted I did not want to settle for something less. The caterer was all ready doing a plated dessert and there was no need for a cake. The wedding was everything I dreamed of and I have no regrets. What I do have is a manilla envelope full of cake clippings which now seems superfluous. What's a girl to do? Make her own cake! 

This blog will chronicle my quest to become a professional level baker and cake decorator. I have always considered myself a 'baker' having learned to bake at a very young age at my others side. After looking at so many lovely cakes I cannot hold back the urge to create some of my own. One thing I know: cake making is expensive. There is a lot of equipment that I will need to amass and a lot of practicing that I will need to do. But I'm willing to stick it out, and I hope you are too! To start out I am armed with several books, some decorating supplies I 'borrowed' from my mother and a lot of excitement. Here's to cake.